
Kessler Stealth Slider review – setup and first impressions

I’m a long time fan of using sliders for tracking shots, recently however I’ve had a couple of projects where a motorised slider would have made my life a lot easier so I decided to invest in a system from Kessler Crane who are the masters of motorised cine gear.
Kessler produce a huge range of sliders including the Pocket Dolly range, the CineSlider and the Shuttle Pod. Wanting a system that I can travel with I’d been thinking about buying one of the sliders in the Pocket Dolly range. On doing some research it seemed that the drag control on the CineSlider was a really handy feature but none of the standard pocket dolly range has a drag control.
Recently Kessler have introduced a new slider to the range in the form of the ‘Stealth‘. The Stealth features the drag control from the CineSlider and doesn’t have a crank so it suited my needs perfectly. It’s also pretty cool looking in black with a more angular design than the rounded pocket dolly.
The Kessler Stealth comes in three lengths, the 40.5″ standard, the 28.5″ traveller version. and the 22.5″ mini.
So here’s what I decided to order…
Stealth Slider
- Length: Traveller (28.5″) as it’s short enough for flights whilst offering a long enough travel for my needs.
- Feet Add-On: I opted for the All-Terrain Outrigger Feet because they offer more adjustability.
- Support Add-On: None. I planned to use my normal tripod plates.
- Custom Case: Stealth Soft Case.
- Camera Mount: Kessler Low Profile Ball Head. I also ordered a multi angle mounting plate for vertical motion shots.
Motion Control
I opted for the elektraDRIVE Bundle with basic controller v2.0. For more complex moves with multiple axis and precise speed control the more expensive electraDRIVE bundle with Oracle Controller would be a better choice but I preferred the more compact option as I planned on basic motion only. Here’s the details of what I ordered…
- Controller: Basic Controller v2.0
- Speed Doubler Pulley: Yes I added this as it allows more speed options.
- Motor Mount: CineSlider / Stealth – obviously!
- Motor: elektradrive 200 series.
I opted for the 200 series motor as it’s slow enough to allow slower basic moves and time-lapses but is also fast enough to pull off normal motion moves. Using the optional speed doubler pulley also doubles it’s speed so very fast moves can be achieved if required. The basic package comes with a Bescor 12v battery and all the required wiring and power supply units as standard.
Unboxing & Set-up
The kit was extremely well packed with all the individual items you can see below packed inside two larger cartons.

Opening the the white Kessler box reveals the custom soft case for the Kessler Stealth slider.


Inside the custom case you find the slider vacuum sealed in plastic and cardboard, you really get the feeling that Kessler are doing everything they can to ensure both a well protected product and a great experience for the purchaser.
On removing the Stealth Slider from its wrapping it felt suitably high quality and solid.


Both the rail and the cart are pre-drilled with various threaded mounting points allowing for a lot of attachment choices. Below you can see that Kessler pre-fitted the flat mounting plate which would be used for heads with a flat base.


I ordered the optional Low Profile Ball Head so I removed the flat adapter prior to fitting that.


Here you can see the Low Profile Ball Head ready for fitting. I was surprised by how small the plate is on the bottom of the head, it doesn’t really offer much area to tighten down onto the cart although it does lock solid. I soon found that the cart got scratched by attaching this ball head. The first of many war wounds I’m sure!


The ball head itself is great, very low, secure and easy to adjust. To loosen the ball head the handles are turned counter clockwise. The downside is that I found that this often led to me accidentally loosening the whole ball head from the cart rather then just releasing the lock on the ball. It would be great if there was an option to lock the ball head to the cart with a more reliable connection such as the ability to bolt it in place from underneath the cart.


The All-Terrain outrigger feet come in their own soft case which keeps them separated. It has to be said that these are a fantastic design. Each foot assembly consists of a central bar with a thumbscrew that’s retained so that it doesn’t get lost. The rotating foot parts are locked with a single clamp that makes folding out the feet really fast and simple.


Below you can see the feet extended, the rubber balls on each end allow the feet to grip at any angle from vertical to straight out. This makes levelling the slider on uneven ground a lot easier than the standard outrigger feet which offer less height adjustment.


Here you can see the feet being attached to the slider. Although they they use a single thumbscrew the tops have rubber strips attached which stops them slipping.


With the outrigger feet attached the slider starts to resemble some kind of stealthy insect! It’s rock solid with the feet all levelled and doesn’t feel like there’s any chance of it slipping. The only down side to this solution is that it can make the whole rig quite wide when the feet are extended.


With the basic slider set-up it’s now time to add the motion control. Firstly the knob atop the drag control and the spring beneath it are removed and replaced with the motor mount which fixes in place with a single clamp. As with the clamps on the feet this is the type that can be rotated to any resting position after it’s been tightened. I then added the drive gear replaced the drag adjustment knob for safe keeping although in this configuration it doesn’t have any effect.


Now for the motor itself. The two bolts shown below are removed prior to installation.


I actually removed the drive gear again from the motor mount as this needs to be located inside the motors drive belt and both dropped in to position together. Then the bolts are added again and the whole assembly is locked into place.


Now the controller itself is connected. As you can see the controller comes with all the cabling required as well as a mains power adapter including various plug type fittings.


The controller is connected to the motor using the supplied ethernet type cable which has a doubler on one end to allow connection to the male connector on the motor.


Power is supplied directly to the controller by using a cigarette type adapter which connects to the included Bescor 12v battery pack.


With everything connected up the operation of the slider is really simple. The controller has buttons for left and right with a speed dial in the middle. The speed dial has a single detent in the middle of it’s movement so you can feel when you go past centre. It’s very easy to dial in various speeds or ramp speeds up and down by pressing the buttons and turning the speed dial at the same time and it’s also possible to use the controller in a way where you press a button to start the movement and press again to stop.
The controller has three operating modes that are selectable by turning the speed knob all the way to the left and then pressing both direction buttons. The first mode is where you hold the buttons down to move, the second is where the buttons toggle between stop and start an the third mode is for time-lapse and has various submodes for setting pulse speeds and power levels. The basic controller isn’t quite as basic as one might think!
I found the speed of the 200 motor to be perfect for me, I rarely do fast moves and setting maximum on the controller gave a speed that is more than enough for what are usually my fastest slides. If however I do need to do something a bit faster I can fit the speed doubler wheel as shown below which doubles the available speeds over the standard version.


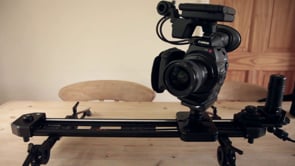
To finish up I fitted a Miller 313 QR plate to the low profile ball head so that I can use the same tripod plate as my Miller DS20 tripod. With the Canon C300 attached to the Stealth it worked perfectly and I can’t wait to get out and grab some footage with it.


This last pair of images show how the Kessler Multi-Angle Mounting Plate can be used to mount a camera for vertical slides. I found that the 200 motor handled my C300 just fine for straight up and down moves. My only concern with this position is the risk of one of those single threaded connectors slipping, I would much prefer the ball head to be secured in a way that it can’t rotate.


I really couldn’t leave you at this point without showing you the slider moving so here’s a very quick and simple video clip showing the rig in operation. As you can hear it can be quite noisy when running fast but then I don’t expect to be using it in situations where noise is a problem.
At the end of this clip you’ll see me using the slider without the motor attached. I’ve heard a few people saying that although they don’t actually use the crank handles on their sliders for movement it’s good to have one anyway because it adds inertia and allows the camera to come to a halt gracefully after a manual move. That did concern me a little but interestingly the camera seems to slow down really nicely after a push anyway so I’m glad I opted for one without the crank.
Kessler Stealth - day 1
Costs & Shipping
So now for the bad news! Actually that’s a little unfair as I think Kessler’s pricing is really good given the quality of the products they supply.
All of the items I ordered came in at $2,060. That’s quite an investment for a slider system but you need to bare in mind that the slider itself is around $800, all those extra options including the motion control system add to that cost.
Unfortunately Kessler don’t have any distributors in the UK so I ordered direct from their website. I paid $370 to have my order shipped to the UK by UPS which resulted in final costs of around $2,400 (around £1,500). Add to that £297 VAT and £47 Duty for the British tax man and as a UK buyer you’re looking at a total investment of around £1,850 inc taxes for the entire kit I ordered.
Summary
I’m totally blown away by the Kessler Stealth slider, the build quality is second to none and it works beautifully both motorised and operated by hand. The belt drive system with the drag control allows you to dial in the perfect amount of resistance for various weight cameras allowing for a much smoother slide than any slider I’ve used before.
My only reservation was the fitting of the low profile ball head, it was a shame to see it scratch up the cart of the slider. That’s not really the fault of the slider itself though and other than marking the cart it might prove to be fine in use.
Pricing wise this setup was more expensive than any slider I’ve used before but that’s mostly due to shipping and import costs, if buying in the US the slider itself at $800 is really good value.
There’s not much more I can say, this product is great and I can’t wait to get out and use it! I’m also very excited about trying more Kessler Crane products in the future.


Paul, Great review. I am interested to find out where you purchased the Kessler Stealth Traveler Custom Case. I am struggling to find a case which fits the 28.5 inch slider in snug. Any links would be appreciated.
Hi Aaron. I ordered mine from Kessler with the slider.
Hi – thanks Paul. Just finished watching the latest Walking Dead episode and the last episode of True Detective and now I’m listening to you on a podcast I’d never heard of until now – Final Cut Grill, anyway great to hear your voice, been following you for a long time now, anyway a great nights entertainment lol, zombies, serial killers and you.
Hey anyway Paul – thanks again for the help
Chris – a fan.
You’re welcome Chris. I hope I was less scary than the Zombies! :)
Great review Paul, it’s been a couple of years now, I’m in the market for a slider considering the carbon fibre version of Stealth and probably all the accessories you bought (thanks for doing the home work for me lol) just wondered if you are still using this 2 years down the road? if so loving it still, any cons. Any advice would be much appreciated and hey great work btw some of the videos here are gorgeously shot! very talented cinematographer!
I’m in the UK too so I guess I’ll have to go the import route.
Hi Chris.
Yes still using the slider for most of my shoots and it’s still working great, no problems at all. The only thing I regret a little is buying the motor drive, not because it doesn’t work well but just because I find the slider is so smooth and adjustable that I can easily get the shot by hand and so prefer less kit to carry and set-up on most shoots.
It might be worth seeing if cvp have any stock, they do carry some Kessler kit. If not and you do order from Kessler then I’d appreciate it if you link through from my blog as I’ll get a beer or two out of it ;)
Cheers!
Paul
Hi, Paul
Thanks for sharing your thoughts on the slider, I have opted for the same system, will be adding the electra drive system soon. For vertical shots I use a manfrotto 502 head that will tilt right back to level the camera, so no need for extra attachment plate. I also found that a Manfrotto tripod bag 120cm is perfect for the slider with a head installed, and also has plenty of space for other things. Last note, I was going to buy direct form Kessler however it was actually cheaper to buy from CVP.
Paul – How are you finding the Kessler Low Profile Ballhead? Still happy with it? I’m looking for a better solution for mounting my C300 to a Pocket Jib Traveler. Tried (already have) Arca Swiss Z1 ballhead but at 4″ plus Kwik Release + flat adapter it is hitting ~5.5″ off of the jib’s camera platform thus raising the center of gravity too high.
Also, tried a Manfrotto MVH500 head but is also about the same height once the Kwik Release and flat adapter are added. This head also adds too much weight and can’t compensate for correction in two directions.
Looking at the Low Profile Ballhead or a more traditional ballhead like the RRS BH-40.
Hi Jon. The low profile ball head has been very reliable, I use it all the time to mount my C300 on sliders and my travel jib and it works well.
Best regards
Paul
Thanks Paul – great to hear. I got one a few days ago.
Hi, Paul. I just wanted to ask, I bought the kessler stealth. They shipped me via international shipping. Now it is on the way this week it will be on my hands :) but I forget to buy flat mount adapter. Today I understand that I have to have it to mount my bullhead onto slider, am I right? Do I really need it? or slider comes with adapter to mount? thanks a lot :)
Hi Serdar, the carriage on the slider has threaded holes so unless your head has a threaded bolt sticking out of the bottom you’ll need the flat mount adapter in order to be able to mount it.
Hi Paul,
thanks for your Review. I have also the same slider. But after 3 uses the movement is not fluid, it stocks a little bit. Is this normal?
Thanks for your help.
Greatings
Paul
Not sure whats happening there Paul, mines still working great so something must have got inside the bearings or it needs adjustment. I’d contact Kessler as they are always really helpful with things like that.
Paul – are able to use the Stealth on sticks with your C300 and only mounted from the center point?
I have a 3′ Cineslider but it really requires the Kessler Hercules head to be mounted at the center point – which means bringing a separate set of sticks for it. So, I’m looking for a smaller slider that can mount to my regular fluid head (Sachtler FSB-8) and hopefully be able to work with the C300 without resorting to a second tripod or light stand for stability.
Thanks!
Hi Jon, yes I use it on my Miller tripod all the time.
Great – thanks.
Great review! I own the small MYT works slider and am waiting for there motor to come out. I love the build quality of the MYT works slidder but most of there accessories only work with the medium and large versions. They are also coming out with a motor and I am hoping it will work with the small version, if not I may be looking into a kessler setup.
Thanks for the great info on this slider set up Paul, Its great having the close ups on the various bits of kit it helps to understand the product.
I was thinking of upgrading my GlideTrack Shooter to the Hybrid slider but this Kessler setup looks more like it:) Its a shame it stings so heavily on import charges, I noticed that when I bought my Small HD DP6 monitor.
Is there a way to duplicate settings on the speed control?( If you want to set the same speed as the last time you set up for example) or would you need to mark where the dial was at?
Thanks for the great post
Hi Robert.
Yes the import costs and shipping do have a big impact when buying here although I still found the overall cost to be cheaper than buying from distributors in mainland Europe.
With regards to the basic speed controller it does have a detent in the middle position which can be returned to easily but other than that you’d have to mark the position and it would be tough to get it exactly the same speed. The Oracle controller offers a lot more precision if you need that kind of thing as you can dial in speeds between 0 – 1000 so that would be worth considering.
Thanks for the feedback.