Kessler Pocket Jib Traveler Review
I wrote a post about the Kessler Pocket Jib Traveler when it was announced and having ordered one at the time I’ve recently taken delivery of the product so I thought I’d pass on my initial thoughts about it now that it’s in my hands.
As you can see from the image below the folded up Pocket Jib Traveler is around the same size as a Manfrotto 055CXPro tripod, and at only 5 lbs in weight it’s not much heavier either.


One of the things that strikes me about this little jib is just how well designed it is, so many details have been considered in order to make it as portable as possible whilst being a single part. There are window cuts in the metal work wherever possible to keep the weight to a minimum, it really does look and feel like a well engineered product.

The camera mounting plate folds around the main assembly when packed away and is secured in place with a velcro strap, there’s also a mounting point for the clamp that keeps the counter weights in place so that it doesn’t get separated from the jib.


The base allows the jib to be mounted either directly to a flat tripod top or to a ball type attachment for use with ball head designed legs. The base also has additional threaded holes each side of the main mounting point to allow the new Kessler Mini Plate to be directly attached for use with Kesslers Kwik Release System.

For my initial setup I decided to mount the jib directly to the Manfrotto tripod shown above, this would make a really portable solution although is not going to be as rigid as a heavy duty tripod or dedicated support like the Kessler K-Pod.
The pocket jib traveler is basically folded in half to be transported and in order to make that possible Kessler have designed an articulated hinge that allows the two parts to be wrapped around the main pivot point.


The first stage in setting up the jib is to release the velcro strap at the top and then open up the two parts.
The hinge mechanism is then lined up to allow it to be slid inside the main body of the jib.


Once the hinge is inside the main box section the two parts are locked in place with the most rearward locking knob. I found that under load this joint has a small amount of play which results in the two parts of the jib not staying perfectly straight, it doesn’t seem to effect the operation of the jib though.
With the two parts secured together the gib is starting to take shape, next lets move on to the camera mount. The camera plate is flipped over and then secured in place with a spring loaded pin.


The design of the camera plate is interesting as unlike many jibs the arm pivots in the centre of the plate. Many similar products have the camera plate hanging to one side on an L shaped bracket. This design is more complicated but according to Kessler allows for better weight distribution. It does throw up some small obstacles though, I’ll talk about those a bit later.

The front part of the jib is extendable by loosening locking knobs on both the upper and lower arms and then sliding the inner parts of each out. There are indented positions along each arm where the knobs should be secured to keep the camera plate level as the jib is raised and lowered. The image below shows the front part of the jib fully extended and locked off.

Next we move on to the back part of the jib. Again the arm is extendable and is locked of with a locking knob.


The extended part is the required diameter to support small weight lifting style weights, there are also cut-aways to allow weight bags or other items to be hung from the arm to act as a counter weight. So that’s the main parts together, here’s a couple of shots showing the jib fully extended ready to have a camera and counter weights added.


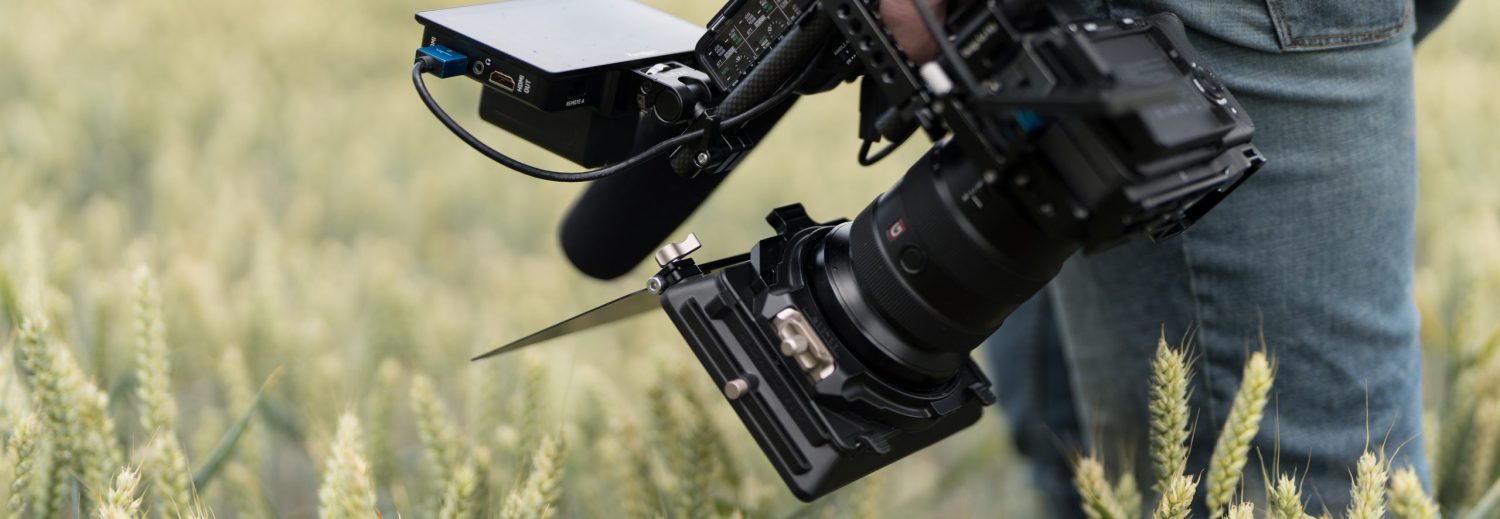
Next I mounted the camera to the jib. I used a Kessler mini ball head and a Miller mounting plate to attach my C100 to the plate.

This is where the centrally mounted plate throws up a bit of a problem. When the arm is up there’s plenty of room around the head but when the arm is dropped lower theres not much room between the mounting point and the arm itself. This will effect the style of camera that’s going to work with the jib. I suspect the mounting plate was designed with DSLR’s in mind as they are fine. My C100 was also usable on a mini ball head but any cameras with longer bodies and forward mounting points are going be a problem as the arm will hit the camera body. The solution would be to use a taller mount or one that moves the camera forward.
Here you can see that the C100 comes very close to touching the arm when lowered.

Next I added the counter weights, the included clamp holds the weights in place. I found 3 x 1KG weights to be a good start for the C100, although with the rear arm fully extended they were slightly too heavy. Ideally the jib needs to balance perfectly.


This is where the extendable part work well as it’s then just a case of pushing the arm back in until the jib balances nicely.
The pocket jib traveler features two friction / locking points that can be adjusted during use. There’s a knob on the right side of the main pivot plate to adjust the friction of the up and down movement and a lever above the tripod mount for locking the side to side movement.
First Impressions
Using the pocket jib traveler for the first time I noticed immediately that it requires a steady hand. I found that trying to control the camera as you would a larger jib by holding the rear weighted section resulted in a lot of side to side wobble at the camera end.. Tightening the vertical friction knob as much as possible helps stop some of that so it’s important to set that as tight as possible but keeping the camera steady still requires a gentle touch.
I found that the best way to use the pocket jib traveler was by standing next to the tripod at the mid point with one hand on the back half and one on the front half of the jib. This stabilises the movement a little although it’s still a challenge to keep things perfectly steady through the move, it really comes down to how gentle and precise you can be in operating it so it will require some practise.
Standing beside the tripod I thought it would make sense to use an HDMI monitor so I rigged up my SmallHD DP6 but then realised that there’s nowhere to attach it, it would have made a lot of sense if Kessler had included some threaded holes on the left side of the main pivot plate.
Although it’s fairly short as jibs go, the travel distance of around 6 ft seems useful, the tripod height can always be adjusted to provide the optimal starting position and again like sliders it’s surprising what can be achieved with minimal movement.
Kessler says the product can support cameras up to 10 lbs and I’m sure it’s physically capable of doing so but I found that as the camera and counter-balance weight increases so does the challenge in stopping the camera from wobbling from side to side.
In my opinion the Kessler Pocket Jib Traveler is best suited for use with DSLR’s. The heavier C100 and C300 can be mounted and used with care but something like the regular 22 lbs Kessler Pocket Jib would provide more stability if transportation wasn’t an issue.
At $599 I feel the Kessler Pocket Jib Traveler offers very good value, it’s ideal for DSLR shooters and with careful use can also handle heavier cameras. Ultimately this is a 5 lbs jib that you can carry in a backpack or a suitcase and as such could get the job done when a larger system is not a practical option.
In use
I’ve just completed the video below for Harley-Davidson, as you’ll see the Pocket Jib Traveler shots are used throughout. Working with the jib was great, I used two water bottles as counterweight for the C100 and carried everything around by myself.
The most challenging shot was one shown at the end of the video as I carried the jib along with my miller tripod and C100 through a crowd of thousands on the beach watching Status Quo perform. It was dark by that point too so I had to use the light on my iPhone to see the camera but the results were worth it.
Euro Festival 2013 Highlights
Where to Buy?
The Pocket Jib Traveler is available directly from Kessler for $599.
9-4-2013 – Note: content updated (reworded)
12-4-2013 – Update:
I took the Pocket Jib Traveler to a shoot in London yesterday and will post some of the results as soon as I’m allowed to. The shoot was a hard start for the PJT as it involved tracking the camera past small objects fairly close to the lens so any wobble was easy to spot. I was able to capture some useful shots but it was hard work and often took multiple attempts.
My advice would remain as stated above, if you need to travel and cannot take a heavier jib with you then having the Pocket Jib Traveler will give you the ability to get a jib shot, but if you can manage something bigger and more rigid then I would take the heavier jib as it will be much easier to work with and you’ll achieve steadier results with more ease.


First off, GREAT JOB with that Harley video! Simply stunning and well done!! I have a question about the following you posted at the end of the review.
12-4-2013 – Update:
I took the Pocket Jib Traveler to a shoot in London yesterday and will post some of the results as soon as I’m allowed to. The shoot was a hard start for the PJT as it involved tracking the camera past small objects fairly close to the lens so any wobble was easy to spot. I was able to capture some useful shots but it was hard work and often took multiple attempts.
First off, were you ever able to post any results? I’ve read in the comments that you originally had a faulty jib which was causing much of your wobble. Was this update made with the faulty jib, or the new properly working replacement jib?
I sometimes get called to do product video (which involves getting up close to the products with smooth movement) and was thinking this might give me some nice value shots at a reasonable price. Would the wobble be too much for this type of work or is it worth giving it a try? Or if you do recommend a heavier jib, and recommendations of a cost effective model?
Thanks in advance and keep up the great work!! I really appreciate your honest review!
I would recommend a slider over a jib if the camera is going to be close to the subject, you’ll get much more stable shots especially if you use some kind of motorised system like the Kessler slider I use…
https://www.pauljoy.com/kessler-stealth-slider-review-setup-and-first-impressions/
Hi Paul – everybody on here (quite rightly) is discussing the jib – however just need to comment on the Harley Davidson video you did – beautiful, really nice shots. It captured the event in 4 mins and looks great – well done! If you were in the UK Id put you on our freelance list!
Thanks Jason. I am actually UK based.
Best Regards
Paul
Hi Paul.
Thanks for the review. Now that you’ve had it for awhile, would you recommend this over another portable jib like the aviator? I’ve read the after a few weeks of use it gets squeaky and wobbly. Is this True?
I’ve not tried the aviator Sheldon but I travel with the Kessler PJT a lot and I’m still really happy with it, mine certainly doesn’t suffer from the problems you mention. As far as I can see the aviator might be a bit lighter but I’d still choose the kessler as it’s a much stronger design.
Hi Paul
Thought I would check back and let you know how I’ve got on now my Pocket Jib is back! My faulty unit was really annoying when I got it the central column was really creaky and thus I had to really force the jib up and down which resulted in a big wobble. I really thought hat Kessler quality controlled every item that they send out, on this occasion they didn’t.
Fast forward a good few weeks and after sending back the jib I have since received a new unit and the difference is very clear. The new jib is way smoother and thus there isn’t much wobble at all. The jib is way easier to move and the shots are quite good. So Kessler have actually turned things around just wish they had sent a fully working jib in the first place.
Glad you got it sorted Marc
Hi Paul,
firstly a big thank you for sharing all your knowledge and experiences – really, really helpful.
I’m a relatively new C100 user and I have a quick question. In your Harley D film you have a lot of slo-mo footage – how did you achieve this with the C100?!
Many thanks
Hi Steve. I use a C300 as well which provides the 50p footage that I conform to slow-mo. The lack of a 50p mode is the biggest drawback of the C100 unfortunately.
Thanks for your great review Paul. Just found it while searching for a manual for my traveler. It’s missing or I haven’t found one yet. So your review has good information! One thing I am also missing is a leveling bubble maybe on top of the tripod mounting point. The wobble is definitely there, but I think after some practice it will hold my c300.
Ps. I have the 2nd batch and there are two drilled holes on the side of the base to hold something like a monitor.
Thanks. Andre
Great review Paul. Everyone else, I am the other Paul who made the video review. I have since used a loaded up C300 on the thing covering Boston Marathon memorial coverage on a windy day… on that little ball head. Crazy I know.
It works. There is indeed wobble, but I find if the jib is perfectly balanced, and the drag control engaged a little bit, it’s smooth. The only sway I see is at the beginning and end of the movements, which I can mostly control with my body.
That said, I think a C300 is too much on this thing. That is why I own a normal Kessler Crane. But in a pinch? Like having to work around crowds and move discreetly like at the memorial? A regular jib or crane simply would have not worked. Period. So I got nice job shots where I would have none, that were basically steady. Yes I had to stabilize some of them, but for the amount of time on screen no one would notice. But they will notice the nice move with the camera. So.. tradeoffs.
I own another 4′ jib, a cheapie from ProAm I use to hold up my wall, and that thing is utterly useless compared to this product.
Now ideally, if you want perfection all the time, I’d keep the weight under 3 lbs. It can HOLD 10 lbs weight/metal wise, but I don’t think it can handle the shift in center of gravity with larger cameras as designed as well as you might like. Kessler designers essentially admit this fact – it was meant for DSLR form factors. That isn’t to say you can’t use it with a larger camera.
I love it, I have been using it, and have been getting great shots with a loaded C300 precariously stuck to a ball mount on the end of the thing. But that’s with a lot of takes, so be advised.
Thanks for the feedback Paul. I’ve just returned from a Harley-Davidson shoot in the south of France and have some fabulous shots that used the traveler.
One of the most demanding shots required me to work my way through a crowd of thousands watching Status Quo, to make things harder it was a beach stage to trudging through the sand on my own with my miller trips and the pocket jib traveler wasn’t easy, but it worked and the results are stunning. I’ll share them very soon.
I first used a D800 with 24-70mm (that glass is quite heavy) and the wobble I had was shocking. I have just tested with a Nikon D5200 with a small 50mm 1.8 so that is even lighter than the D7100 he was using. I think I have got to oil the centre column or something the creaking and vibrations are definitely affecting the fluidity of movement.
Mine doesn’t creak Marc so I’m not sur what would be happening there, maybe a clean and oil would help. Have you used it anywhere where dust might have got in it?
Not yet haven’t used it in the field yet was going to take it out tomorrow but can’t use it in its current state. I’m going to see what Kessler suggest. I’ll report back!
Thanks for the replies!
Question is how did/does Mr Bloom get his so steady???:-)))
After having a few more goes with it there seems to be lots of creaking noises from the centre column and at the head. I thought this was from the screws being to tight so I fully unscrewed the ‘Drag’ nut off and still heavy creaking. I think this is the route of ‘my’ particular problem with it. The internals are not allowing me a fluid moment so I have to put more pressure on the backend which then results in more wobble from the column.
Marc
Which camera are you using Marc? Phil used a light DSLR which makes a difference, but he too says you need to be extremely delicate with it so its just a case of perfecting it. I’ve used it for a couple of jobs now and with each job I’m getting less wobble in the footage.
If you could ever given a comparison between the Kessler Pocket Jib Traveler and Aviator Travel Jib it would be really well received. I know I am not the only one interested in a small suitcase friendly jib and would love to know which one is a better pick.
I’ve not tried the Aviator Jib, if I ever get the chance to see one I’ll be more than happy to compare them. From what I’ve seen the Aviator product is a lot lighter but it doesn’t have many of the features of the Kessler like the recessed lock pockets and the ability to directly mount weights. It would be interesting to compare stability.
I don’t disagree on the build quality for its design and ergonomics, which I think are first class. It is just the trade off with stability, like you have mentioned. If that centre section was more secure it would be near on perfect for the size.
What I have found after using it a little more is that if the arms (camera side) are reduced it makes the wobble less prominent but again there is a trade off on the height and reach you can achieve.
I look for ward to the footage you have shot.
Kind Regards,
Marc
Thanks Marc, keep me updated about how you get on with yours too.
I have also found that there is indeed a very noticeable amount of wobble. I find that loosening the central drag control gives you a smoother up and down motion but it is way to unmanageable to deal with the wobble. When tightening the drag it does make things more rigid and gets rid of the wobble but then you have to really put some effort into your arm movement, thus making things seem much more effort than they should be. This is the first time I have bought a kessler product and to be perfectly honest I thought, after they always go on about the quality of their products, this would be more stable and fluid. I know you have mentioned that with this there is a certain trade off with weight and portability but I don’t think it cuts it.
Have you had to image stabilise the footage at all?
Hi Marc
Thanks for passing on your findings, it’s always good to hear other people opinions. Today will be my first day editing footage from the jib so I’ll let you know if I need to stabilise it at all once I’ve finished.
I have to disagree with you on the general build quality, I think it’s built well and uses a clever design, certainly compared to other ‘ultra’ jibs on the market. I agree that it would be even better if it offered more stability around the pivot point though as that does seem to let it down the most, I’m sure many people would trade a couple more lbs for a more stable design there.
Paul, thanks for the review. I have a cheaper 4 foot jib that I have gotten fairly good with. I also had wobble but have learned to better control it with experience. I make sure the arm is perfectly balanced so a touch of a finger can start the movement. I use a Manfrotto 035BN Binocular Super Clamp which weighs about 8oz. to fine tune the balance. Also, use my camera’s remote stop/start control to avoid touching the camera and adding unnecessary movement.
Thanks for the review Paul. Although I still want one and they are all sold out. Can I buy yours? Seriously. I make commercials for The Home Depot and run around tight spaces with the 5DMK3. I’d love to buy this from you.
Hi Phil
I’m not ready to part with it yet I’m afraid, I hope you manage to pick one up soon.
Oh gosh. First, you said “my first impressions are that the pocket jib traveler is well designed”
and then you stated “I found that trying to control the camera as you would a larger jib by holding the rear weighted section resulted in too much wobble at the camera end, this was due to combination of the tripod flexing and there being a small amount of play around the main vertical pivot point.”
ANY wobble at the camera end is not good. Period. Arm bending at the middle means there is insufficient structural rigidity.
I understand what your saying, it would have been better if the design had managed to achieve perfect stability however as I said in the review I think a compromise has to be accepted to allow such a portable design. If you need something with a heavier more rigid design then there’s also many other models in in kesslers product line.
As for the bend in the middle, this is not due to the parts bending, it’s because there is a small amount of play where the hinge slides insides the arm causing the two sections to sag when loaded, this dies not seem to effect stability though. This is obviously a concern so I will add something about this in the review just to clarify that point.
Thanks for that review Paul. Look forward to seeing examples of your work with this bit of kit.
Just a couple of questions. How long do you estimate it will take you to set this up in the field? And am I right in thinking that the weights you have added to balance the set up are not part of the supplied kit.
I think this is probably a step to far for me to handle on my own but look forward to hearing how you get on.
Hi Mark
It doesn’t take long really, probably a couple of minutes. No the weights are not included, I borrowed some from the Gym I use :)
My plan is to try and use whatever is to hand as counter weights if flying, a few bottles of water in a bag should do the trick.