Sony FX3 ProRes RAW Workflow with Ninja V and FCPX
In this post I’ll take you through my ProRes RAW workflow and show you the settings I use on both the Sony FX3 and the Atomos Ninja V HDMI recorder. After that I’ll describe the benefits of working in ProRes RAW using FCPX.
Sony FX3 ProRes RAW Setup
I’ll start by showing the settings I use for the Sony FX3 for shooting in ProRes RAW. First let’s look at the External Output in the setup menu.
Rec Media During HDMI Output: On
This is whether or not you want to record internally on the fx3 at the same time as sending the signal to the external recorder. I have this set to on so that the camera records a backup.
RAW Output: On
This is where raw output is switched on and off. When it’s switched on the Ninja V changes mode and you get a warning on the camera telling you that you have to connect the device that supports raw.
Output Settings: 25 or 50
This is where you choose between either 25p or 50p recording. This also affects the internal recording as well. The choice you make here will depend upon what you’re shooting and how the footage will be used.
Color Gamut: Slog-3/S-Gamut3.Cine
All Raw recording is done using S-Log 3 but you can choose between S-Gamut3 and S-Gamut3.Cine. I use S-Gamut3.Cine depending on your preference.
Timecode: On
Rec Control: On
I’ve got this set to on because it enables the camera to start and stop the ninja recording when pressing the record buttons on the camera.
4 channel audio output: CH1/CH2
By default this is set to send audio channels one and two vis HDMI. If you wanted to send channel three and four using four you can change that here.
Sony FX3 Movie Settings
It’s worth noting that once the camera is setup as described the way options are chosen in the movie settings is slightly different to normal.
For file format you can only choose between XAVC S 4K and XAVC S-I 4K. You’ll also see that the movie settings are greyed out. Th9s is because the frame rate is now controlled by the external output settings in the setup menu.
Atomos Ninja V ProRes RAW Setup
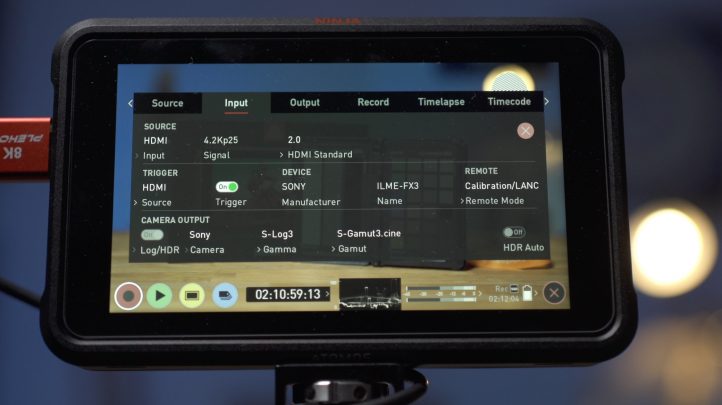
The Ninja V source page needs to be set to HDMI and then the Input page is set as follows.
The only things you can change here are the HDMI standard (mine is set to 2.0) and the Trigger (set to on). The rest of the settings are automatically sent by the camera.
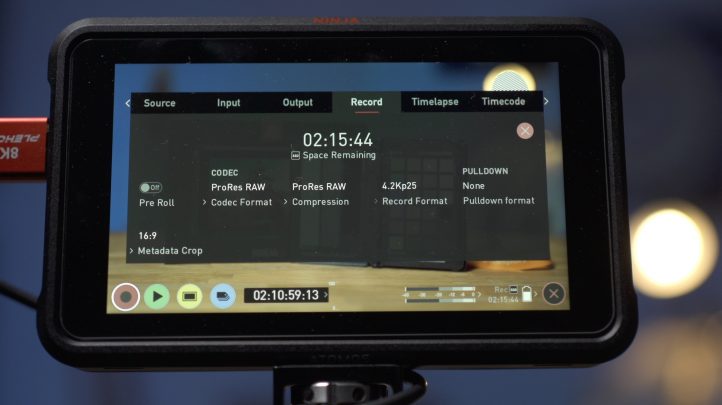
ProRes RAW Record Settings
The codec should be set to ProRes RAW
Codec Format: ProRes RAW
Compression: ProRes RAW
The compression can be set to either ProRes RAW or ProRes RAW HQ. The latter provides even more image data and bigger file sizes however I stick to ProRes RAW as this already produces very big files with plenty of image quality.
Metadata Crop: 16:9
At the bottom we’ve got the 16:9 metadata crop. What this does is it converts the clip so that it will be formatted to fit a 16×9 frame. By default the image that comes straight from the sensor is not a perfect 16×9 aspect ratio so you’ll have to scale it to fill the frame in final cut. I set this to on because it just makes the post production a little simpler.
Ninja V ProRes RAW Activation & Firmware
If you’re not seeing any of the ProRes RAW options on your Ninja V you’ll want to check that you’ve got the latest firmware installed. I’m currently running version 10.71 but depending on when read this video there may be newer versions available.
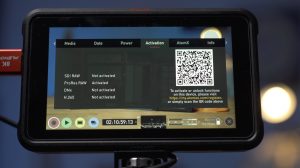
Also you do need to have ProRes RAW activated on your Ninja V. This is a free update from atomos but in order to activate it you do need to go to the Atomos website and register your device to get the activation code.
Shooting Considerations for ProRes RAW
It’s worth remembering that when shooting in ProRes RAW both lens corrections and noise reduction are not applied to the footage so you really need to make sure you stay on top of exposure to control noise in the images.
ISO Settings
Because ProRes RAW is recorded in S-Log 3 It’s important to try and stick to the base ISO levels of 640 ISO and 12 800 ISO as much as possible. If you have to stray too far past them then consider changing to the nearest base level and under exposing or over exposing a little rather than pushing the ISO. Even if you do have to shoot in low light or raise the ISO then it is possible to remove the noise in post production and achieve better results than the in camera noise reduction however it will require a lot of processing time!
File Sizes
ProRes RAW files are big and fill up storage space a lot faster than shooting XAVC-S on internal cards. I use 1TB M-SATA memory taken from Samsung T5 Drives which are fitted to AndyCine Lunchbox caddies. Each of these 1TB drives will usually hold 2 – 3 hours of ProRes RAW footage. I say usually because ProRes RAW is a variable bitrate codec so the file sizes will vary depending on the complexity of the shot.
The ProRes RAW file sizes are a little more than twice the size of the FX3’s internally recorded XAVC S-I files but it’s worth baring in mind that even though the files are RAW, they are still a little smaller than a regular ProRes 422HQ file as shown in the graph below.
For more information read the white paper on ProRes RAW from apple.
Post Production Benefits
It’s in post production where you really benefit from using ProRes RAW with the Sony FX3.
Fast offloads
Despite the files being larger, offloading from a fast SSD drive is a lot faster than offloading from SD cards. I use a Sabrent Sata to USB 3.0 adapter for connecting the SSD’s to my mac.
Image quality
The ProRes RAW files recorded on the Ninja V with the Sony FX3 are 12 bit, that may not sound a lot more than the 10bit internal codecs but it actually means that the footage contains a lot more colour information. With 10 bit offering a little over 1 billion colour options, 12 bit offers over 68 billion. Bear in mind though that this difference will barely be visible for general production use unless you plan to do heavy grades.
Resolution
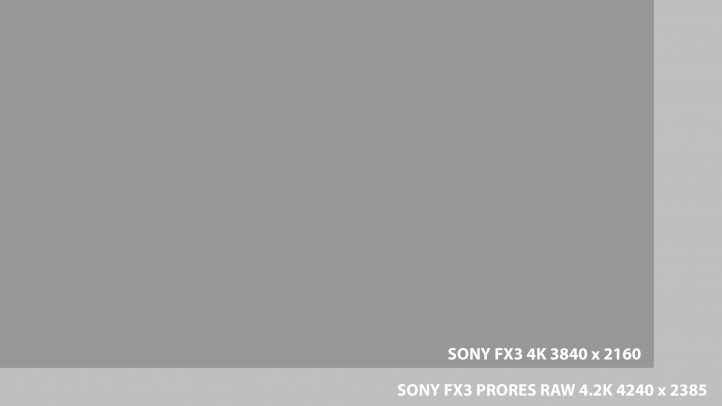
The internal XAVC S footage from the FX3 is recorded at 4K UHD which is 3840 x 2160 pixels. The ProRes RAW files are recorded at 4240 x 2385 giving more resolution to use for down sampling or punching in.
Efficiency and Playback
Despite the ProRes RAW files being very high quality they also offer smooth playback on even my 2014 iMac 5K without any need to import the clips in to a Final Cut Pro library. The ProRes files can be ‘left in place’ when importing allowing for externally referenced media without any need to transcode or create original media clips inside the library.
ISO & White Balance Adjustment
One of the biggest benefits to shooting in ProRes RAW is having the ability to change ISO and Colour Temperature in post production. Having these options means that exposure adjustments and white balance corrections are easier and take a lot less time.
Purchase links for kit shown in this post:
The following are affiliate links. If you use these links to purchase products then I will make a small commission on the sale which is used to fund the production of these posts. Thanks for the support.
Camera: Sony FX3
Lens: Sony 50mm GM
Cage: SmallRig half cage
Rod: SmallRig 4″ carbon rod
Monitor mount: Nitze N54-F5
Recorder: Atomos Ninja V
Drive Caddy: Andy Cine Lunhbox
SSD: Samsung T5
SD Card: Angelbird V90 128GB
HDMI Cable: Plehood 8K Cable
Battery: DSTE NP-750
SATA – USB Cable – Sabrent USB Adapter
MacBook Hub – Anker Macbook Hub








Hi Paul, thanks for the useful article ! but I have a problem matching the internal mp4 file of my FX3 with the external prores raw- I use Resolve 17 and transcode the raw footage in apple compressor (not FCPX, I just bought the compressor plugin,) but the colors are different from the internal file; I tried all the different color spaces ,REC 2020-PQ-HLG -P3D65 etc.. in the video transcoding properties of the plugin but it changes nothing . Do you have an idea regarding this issue? many thx ! alvin
I have a Ninja V which I connect to a Sony FX3. See attached – the image on the Ninja V
does not cover the entire screen. Please advise how I can get the image to fill the entire
screen of the Ninja v ?
Hi Tim. Unfortunately attachments are not sent with comments so I cannot see your image. The only thing I know of that causes the image not to fill the screen with the FX3 is if you have HDMI info displayed which causes the output to be 4:3 and not 16:9. If it’s something else then please describe whats happening and I’ll be happy to help if I can. Regards, Paul.
Thats useful info. I’d like to ask about the lunchbox thing you use on the Ninja, can you say a bit more about what that is and what you had to do to the T5 drive?
Hi Shane. So the AndyCine Lunchbox caddy is an aluminium shell that comes with a small M-SATA to SATA circuit board. In order to use it you need to disassemble a Samsung T5 drive and remove the M-SATA drive from it. This can be quite a scary process with a drive costing over £100 but I found it to be straightforward. Once removed the M-SATA drive is then fitted to the circuit board from AndyCine and then fitted inside the caddy with some thermal transfer pads either side to help dissipate heat. The whole thing only takes a few minutes to do but it obviously removes any warranty on the T5 drive so has do be done with full understanding of that. I hope that helps.